Category: Bakery

Brady’s Best Baked Goods

  • Monster Cookie Protein Balls

    I’m back with a variation on my protein ball recipe! The change with these is the peanut butter protein powder and the mini M&M’s. With that small change, these taste just like a monster cookie but a lot healthier and in bite sized form. Perfect for a quick snack around a workout or to get you through to your next meal. If you love peanut butter, these are the ones for you.

    Tips and Tricks

    • The most common error with this recipe is too much milk. I would recommend adding 20 ml of the milk, mixing, add 5 ml, mixing, and then repeat until these form the correct texture. If you add too much, the batter will be wet and won’t form into balls. If that happens, don’t worry. Just take your batter and press into a sheet tray lined with parchment paper. That way after the chilling, you can pull them out of the freezer and cut them into bite sized chunks. They will taste the exact same but they just wont be as pretty.
    • I highly recommend trying to find mini peanut butter M&Ms for this recipe. They go almost too perfectly and make it taste so good. I can’t say enough how good it works.
    • It might be worth it to make a double batch because from personal experience, they disappear in a few days. They go even faster if you share them with other people.

    The Recipe

    Monster Cookie Protein Balls

    • Servings: 12 Balls
    • Print

    This recipe is like if a monster cookie was healthy and way quicker to make. They are worth a try if you like small little snacks


    Ingredients

    • 40 g (1/2 cup) of Oats
    • 60 g (2 scoops) of Peanut Protein Powder
    • 30 g (2 tbsp) of Mini Chocolate Chips
    • 30 g (2 tbsp) of Mini M&Ms
    • pinch of Salt
    • 32 g ( 2 tbsp) of Peanut Butter
    • 20 g (1.5 tbsp) of Maple Syrup
    • 35 ml (3 tbsp) of Milk

    Directions

    1. In a small bowl, mix together, Oats, Protein Powder, Mini Chocolate Chips, Mini M&ms, and Salt.
    2. Add in Peanut Butter, Milk, and Maple Syrup and stir to combine. It may seem too dry but keep mixing and it will come together.
    3. Roll into 12 balls and place on a plate or pan. They put that into the freezer to chill for an hour or so.

    Nutrition


    Per Serving:
    65 calories;
    5 g protein;
    2 g fat;
    6 g carbohydrate;

  • The Cinnamon Roll Recipe

    This is my most popular recipe at my bakehouse. It is also the most tested recipe that I have developed. It has gone through countless iterations and I can proudly say, ” Here it is”. Its been over 5 years since I started making these cinnamon rolls and in this recipe, I’ll share all my tips and tricks to make a cinnamon roll that you or anyone that tries it will not forget.

    Tips and Tricks

    These cinnamon rolls take some serious effort but they are totally worth it. Here are a few ideas to help make these rolls a bit easier.

    • When letting the rolls rest for longer periods of time, do what is convenient for you. These longer rise times really allow for a lot of flexibility.
    • After the rolls are made into a log, stretch the log and try to elongate the roll to even out the dough. The ends will always be smaller but you can try to make them similar to the middle.
    • Another note is to trim off the ends of the dough log. This serves two purposes. One, removing the ends will make the rest of the rolls look prettier and thus more tasty. Second, you can use these trim pieces as tests for timing and flavoring. They will cook slightly faster so be aware.
    • When cutting the log for your pucks, I recommend using a bread knife. It will glide right through the dough and create nearly perfect rolls. See the picture below and to the right for some really pretty fresh cut rolls.
    • When splitting the log up into the 12 section, I recommend cutting the log in half, then each half in half again, and then doing thirds. This way you get the most consistent thickness of all the pucks. See the picture below and to the left for the quartered log.

    The Recipe

    The Cinnamon Roll Recipe

    • Servings: 12 Rolls
    • Difficulty: Hard
    • Print

    These cinnamon rolls are a labor of love and anyone who tries them will love them too!


    These can be prepped ahead of time. These can be made without Sourdough Discard. See more notes about both below.

    Ingredients

      Dough

    • 260 ml (1 1/8 cup) of Milk
    • 100 g of Sourdough Discard
    • 2 g of Active Dry Yeast
    • 90 g (1/2 cup) of White Sugar
    • 4 g (1 tsp) of Salt
    • 85 g (6 tbsp) of Unsalted Butter
    • 500 g (4 cups) of All-Purpose Flour
    • Filling

    • 150 g (1/2 cup) of Brown Sugar
    • 20 g (2.5 tbsp) Cinnamon
    • 1 g (1/4 tsp) Salt
    • 115 g (1 stick) of Unsalted Butter Softened
    • Cream Cheese Frosting

    • 115 g (3/4 cup) of Cream Cheese Softened
    • 10 g (2 tsp) of Vanilla Extract
    • 140 g or (1 1/4 cup) Powdered Sugar

    Directions

    1. For the dough, heat up milk to anywhere between 70F to 85F. Add the milk, yeast, and sourdough discard to a bowl and mix until combined. Then add in sugar, salt, and melted butter then mix until combined.
    2. Add in the flour and then mix until combined. Let rest covered for 10 minutes. Then knead the dough until a shaggy ball forms. About 3 minutes.
    3. Let the dough rest covered for at least an hour and then knead for 2 minutes. Then shape into a ball and cover again. Place in the fridge overnight or for at least 4 hours. I’ve left it at this stage for over 24 hours.
    4. While the dough rests, its time to make the filling. For the filling, add brown sugar, cinnamon, and salt to a bowl and mix. Then add in the softened butter and beat with a paddle until well combined. It should create a brown paste. I recommend using a stand mixer or hand mixer for this as it creates the correct texture but you can do it by hand.
    5. Place this mixture in a container until its time to be used.
    6. After the dough has rested, it is time to shape the rolls. Let the dough warm up for at least 10 minutes at room temperature. This will allow it to roll out thinner and easier. Flour your work surface and place the dough on the flour. Slightly stretching it as you go. Press and stretch the dough to get it into a rough square.
    7. Using a floured rolling pin, roll the dough into a 12″ x 12″ square. It should be between 1/8″ and 1/4″ thick. Once rolled out, make sure the dough isn’t sticking to your work surface.
    8. Spread on the filling mixture, trying to cover as much of the dough as possible. Leave one edge free of the filling. About a finger’s width. Once spread evenly, start rolling the dough, beginning at the edge opposite of no filling. Roll into a tight log, add a small amount of water to where there is no filling, then finish the roll. The water will create a seal and keep the roll together.
    9. Prep your 9×13 baking dish by covering with butter or a light coat of spray on oil. We don’t want these rolls to stick.
    10. Now that you have a log, cut into pucks about 1″ thick. Place into the baking dish. Cover and let rest for at least 2 hours at room temp or overnight in the fridge.
    11. While the rolls rest, let’s make the frosting. Add in softened cream cheese, sugar, and vanilla extract into a bowl. Mix with a whisk until a thick cream forms. I recommend a stand mixer for this for the ease. It will take between 3 and 4 minutes. Place into a container and then into the fridge until the rolls are done.
    12. After the rolls have rested, pull them out of the fridge for at least 1 hour and up to 3 hours to warm up. Your bake time will vary based on how long you let them warm up. While this happens, preheat your oven to 350F. Once dough has warmed up, place into the oven covered for 40 minutes.
    13. After 40 minutes, remove the cover and bake for an additional 15 to 20 minutes. They should just start to get some golden brown around the edges and high points.
    14. Let cool for 5 minutes and then frost them. They are now ready to eat. Enjoy!

    Nutrition


    Per Serving:
    400 calories;
    7 g protein;
    18 g fat;
    54 g carbohydrate;

    Notes

    1. Parbaked Cinnamon Rolls
      • Often with these rolls I need them first thing in the morning and it can be really difficult to get up early enough to bake them completely in the morning. So, what I like to do is bake them for about 40 minutes at 350 F and then pull them out of the oven and completely cool. You can either store in the fridge overnight or freeze. That way you can bake them early the next morning or a different time for 20 minutes at 350 F. This will keep the cinnamon rolls fresher and a lot tastier if you can finish baking them and eating them on the same day.
    2. Sourdough Discard Substitution
      • I really recommend using a sourdough discard for this recipe as it gives the cinnamon rolls a really nice tang that pairs well with the cinnamon. But not everyone has a sourdough starter so there is an easy sub. Just increase the amount of active dry yeast to 5 grams instead of the 2 grams. That little change will provide enough lift over the long time frame that these have to rise.
  • Tiramisu Protein Balls

    Have you ever needed a small quick snack that won’t destroy your macros for the day? Then I have the perfect little treat for you. These protein balls come together in just a few minutes, high in protein and will give you a boost in energy.

    I make these every few weeks because they are great for a quick bite to eat before a workout or a nice snack to have to tide me over between meals. I recommend giving these a shot if you are looking for a healthier alternative for other sweet treat you may be craving if you are on a health or weight loss journey.

    If this flavor isn’t for you, I’ll have more recipes out soon with different flavors for you to try. But in the mean time, give these a shot and let me know what you think!

    The Recipe

    Tiramisu Protein Balls

    • Servings: 12 Balls
    • Print

    A quick and easy snack that will stay within your protein goals that everyone will love!


    Ingredients

    • 40 g (1/2 cup) of Oats
    • 60 g (2 scoops) of Cinnamon Protein Powder
    • 10 g (2 tbsp) of Dutch Cocoa Powder
    • 30 g (2 tbsp) of Mini Chocolate Chips
    • pinch of Salt
    • 32 g ( 2 tbsp) of Peanut Butter
    • 20 g (1.5 tbsp) of Maple Syrup
    • 40 ml (3 tbsp) of Milk
    • optional: 2 tbsp of Instant Espresso

    Directions

    1. In a small bowl, mix together, Oats, Protein Powder, Cocoa Powder, Mini Chocolate Chips, and Salt. Optionally, add in Instant Espresso as well.
    2. Add in Peanut Butter, Milk, and Maple Syrup and stir to combine. It may seem too dry but keep mixing and it will come together.
    3. Roll into 12 balls and place on a plate or pan. They put that into the freezer to chill for an hour or so.

    Nutrition


    Per Serving:
    65 calories;
    5 g protein;
    2 g fat;
    6 g carbohydrate;

    One item to note on this recipe is you do not want to add too much liquid. If you add too much milk these will be really hard to roll into balls. If you do that, don’t worry, there is an easy fix. I take a small container, line it with parchment paper and press the batter into it. I then let it chill as normal but after the hour passes, I cut them into squares and they taste the exact same. A quick fix for a common mistake! It probably happens to me half of the times I make these.

  • Monster Cookies

    Sometimes a simple cookie won’t cut it. Sometimes you need something a bit crazier. Sometimes you need a monster cookie. With peanut butter, oats, M&M’s, and chocolate chips. These are the cookies for you. They are tasty and will make you want another. And probably one more after that.

    Ingredient Notes

    1. With the peanut butter in this recipe, I’ve found that creamy peanut butter makes the mixing process easier as the nuts in chunky don’t allow the batter to mix as well.
    2. My go to M&Ms for this recipe are the mini peanut butter M&Ms. They add a touch more peanut butter flavor and still have that signature M&M flavor. Normal M&Ms work great too in this recipe but the peanut butter ones go the extra mile for the flavor.
    3. For the chocolate chips, I will either use semi-sweet either in normal size or mini. I’ve tried dark chocolate chips and they contrast a little too much to the peanut butter and make the cookie a bit too complex.

    Monster Cookie

    • Servings: 24 medium cookies
    • Print

    This combination of peanut butter and chocolate wrapped in a cookie may cause you to go as crazy as the cookie monster after trying these.


    Ingredients

    • 1 and 1/4 cups (155 grams) of All-Purpose Flour
    • 1/2 cup (45 grams) Oats
    • 1 teaspoon of Baking Soda
    • 1/2 teaspoon of Salt
    • 1 stick (112 grams) of Room Temp Unsalted Butter
    • 1/2 cup (100 grams) of Light Brown Sugar
    • 1/4 cup (50 grams) of Granulated Sugar
    • 3/4 cup (185 grams) of Creamy Peanut Butter
    • 1 Egg (50 grams) at Room Temp
    • 1 teaspoon of Vanilla Extract
    • 1/2 cup (90 grams) of any size Semi-Sweet Chocolate Chips
    • 3/4 cup (150 grams) of any size or flavor M&Ms

    Directions

    1. In a large bowl whisk together flour, baking soda, and salt and set aside for later.
    2. In a medium bowl or stand mixer with a paddle, cream together butter, brown sugar, and white sugar. This takes about 2 minutes.
    3. Next add in the peanut butter, egg, and vanilla extract. Mix until well combined.
    4. Add in the flour mixture and stir with either a rubber spatula or the paddle attachment with a stand mixer. Once well combined, add in the chocolate chips and M&Ms and mix until combined.
    5. If you like a thinner cookie you can bake now. If you like a thicker cookie, cover the dough and let rest in the refrigerator for 2 hours or up to 2 days.
    6. If placed in fridge, let dough warm up for a few minutes for easier scooping. Preheat your oven to 350F.
    7. Using an ice cream scoop or spoon, scoop and shape 1″ balls of dough. I like to form into a tight ball but loose works too. Repeat until sheet pan is full. Place on sheet pan and bake for 10 to 12 minutes.
    8. Remove from the oven when lightly brown on the edge. They will continue to bake once out of the oven. Let rest of sheet pan for 2 to 10 minutes then remove with a spatula and place on a wire rack to finish cooling.
    9. They will stay fresh for a week at room temp but I personally prefer these cookies in the fridge. Either way we both know these aren’t lasting a week because they are so tasty.

    Nutrition


    Per Serving:
    170 calories;
    11 g fat;
    19 g carbohydrates;
    4 g protein;

  • Chocolate Chip Cookies

    These are my favorite go to cookies when I want a sweet treat or need an easy dessert for a crowd. They come together in under an hour or if you have the time, make a day prior for an even better cookie. These cookies balance flavor, complexity, and effort to make a dessert that people will want over and over again.

    These cookies can be made by hand which I personally did for years or in a stand mixer which does make it easier. If you do not have a stand mixer, don’t worry this cookies will still turn out just as great and sometimes even better. I have overmixed the dough a few times with the stand mixer and you can get a tougher cookie. Let’s get to the recipe.

    Chocolate Chip Cookies

    • Servings: 24 medium cookies
    • Print

    A simple cookie is needed in any baker's arsenal. Make sure to have this one in your tool belt


    Ingredients

    • 2 and 1/4 cups (280 grams) of All-Purpose Flour
    • 1 teaspoon of Baking Soda
    • 1/2 teaspoon of Salt
    • 1 stick (112 grams) of Melted Unsalted Butter
    • 3/4 cup (150 grams) of Light Brown Sugar
    • 1/2 cup (100 grams) of Granulated Sugar
    • 2 Eggs (100 grams) at Room Temp
    • 2 teaspoons of Vanilla Extract
    • 1 and 1/4 cup (225 grams) of any size Semi-Sweet Chocolate Chips

    Directions

    1. In a large bowl whisk together flour, baking soda, and salt and set aside for later.
    2. In a medium bowl or stand mixer, whisk together melted butter, brown sugar, and white sugar until no clumps remain.
    3. Next add in the egg and vanilla extract. Mix until the batter is a light yellow in color.
    4. Add in the flour mixture and stir with either a rubber spatula or the paddle attachment with a stand mixer. Once well combined, add in the chocolate chips and mix until combined.
    5. If you like a thinner cookie you can bake now. If you like a thicker cookie, cover the dough and let rest in the refrigerator for 2 hours or up to 3 days.
    6. If placed in fridge, let dough warm up for a few minutes for easier scooping. Preheat your oven to 350F.
    7. Using an ice cream scoop or spoon, scoop and shape 1″ balls of dough. I like to form into a tight ball but loose works too. Repeat until sheet pan is full. Place on sheet pan and bake for 10 to 12 minutes.
    8. Remove from the oven when lightly brown on the edge. They will continue to bake once out of the oven. Let rest of sheet pan for 2 to 10 minutes then remove with a spatula and place on a wire rack to finish cooling.
    9. They will stay fresh for a week at room temp but I personally prefer these cookies in the fridge. Either way we both know these aren’t lasting a week because they are so tasty.

    Nutrition


    Per Serving:
    150 calories;
    7 g fat;
    24 g carbohydrates;
    3 g protein;

  • Sourdough Bread for Anyone

    This recipe is designed for everyday life. It is perfect for anyone that has a busy schedule and can’t be bothered with timings for folds or be locked into a routine because that’s what the other recipes say. This will be a quick guide on what I do to make great bread and the steps I follow.

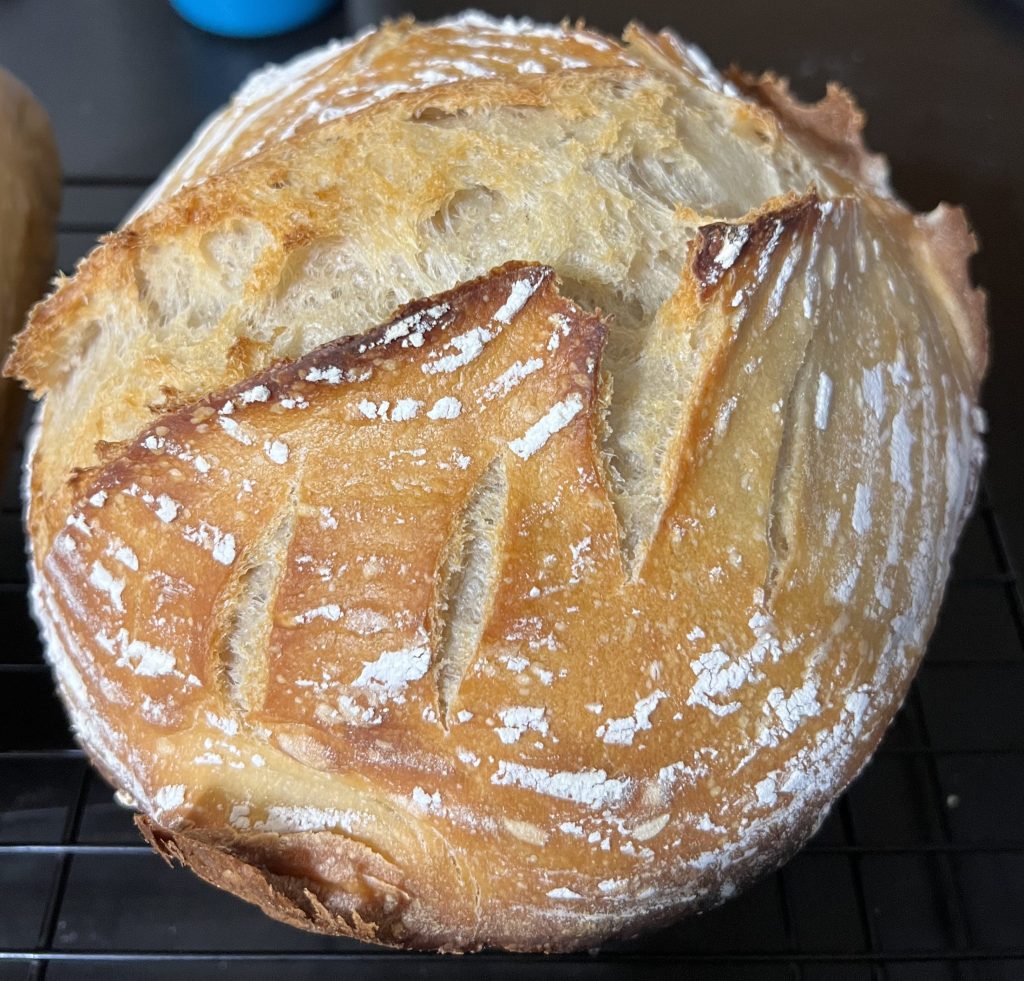
    Let’s get started. I use my full sourdough discard for whatever I make that day. In this case, I’ll use all 220 grams of my discard for one loaf of bread. This may seem like overkill for extra yeast but we will need it with the fermentation style demonstrated in this recipe. With the discard, I empty it into a 2qt round Cambro tub like the one here. I found this size is perfect for a single loaf of bread. I then add 300 grams of filtered water at around 70F (21C) to the tub. I stir this to combine. Once it is mostly incorporated, I’ll add in 5 grams of sugar and 8 grams of salt. Stir to combine. Then I’ll add in 400 grams of flour. I like to use a blend of unbleached flours and the ratio are up to you. My common blend is 1/3rd All-Purpose, 1/3rd Bread, and 1/3rd Whole Wheat. I really prefer the King Arthur flour as it is super consistent and makes good bread and other baked goods. I stir this to combine but only until it looks like all the flour is wet. I will then throw the lid on the container, clean up my dishes, label the tub with what’s in it and then wait 1 to 3 hours to let everything hydrate. After that, I’ll give it a good folding. I run my wooden scrapper around the edge of the tub to loosen everything up. Then I will scoop the bottom of the top and stretch it over the top of the dough. I turn the bucket slightly and then repeat. I do this 10 to 20 times depending on how the dough is looking. After this, I put the lid back on, and throw in into the fridge. I let it rest in the fridge overnight or over 6 hours. I then do the same stretch and folds as before for the same amount. I put the lid back on and into the fridge it goes. I’ll repeat this process, doing folds whenever I have a moment or sometimes I’ll let it sit. I’ve had loafs sit in the fridge like this for over a week and they still turn out great. Just giving them folds at least every other day so they don’t overfill the container. Once I’m ready to bake it, I pull the loaf out a few hours before hand to let it warm up and shape it. To shape, I pull the dough out of the container by hand and then stretch and pull into a ball. Continuously pulling the top into the bottom. I can normally do this without the dough ever leaving my hands. I’ll then place the dough either on a bread sling and parchment paper to do one last mini rise. I get my oven turned on to 425F (220C) and place my dutch oven into the oven to preheat. Once everything is warmed up, I place my dough into the dutch oven and put the lid on. I bake it with the lid on for 30 to 40 mins and then bake it without the lid for another 20 to 25 mins to brown up the top. I let it cool on a wire rack. Now we have fresh baked bread.

    My Bread Theory

    Let’s get into the theory on why I chose to do the things I do in this method starting at the top.

    • I use all of my discard because it makes it easy. I don’t have to find a home for the rest of it as 50 grams could easily make a loaf of bread. Additionally, the extra yeast is nice because we are stressing it a ton by letting it rise for so long.
    • I use filtered water to help reduce containments form tap water which can reduce growth in the dough.
    • I have the water colder than usual(90F or 32C) because the loaf will be entering the fridge long before the heated water will cause the yeast to activate quickly. No one likes a hot bath and then taking a cold shower so I’m guessing the yeast don’t either.
    • I use a little bit of sugar as extra food for the yeast and I think it provides a nice little flavor boost in the bread. I personally think it softens interior of the bread as well.
    • I like to use a blend of flours because then you can get the benefits of each type. Bread flour for the extra gluten development and protein, whole wheat flour for the extra nutrients and better color, and all purpose for reduced cost.
    • I let the dough rest and rise on the counter before placing it into the fridge because this way the autolyzing of the dough can begin. Once this happens, it is significantly easier to mix and fold the dough.
    • I let the bread rest in the fridge for so long because it is convenient. I don’t really have to think about it and it doesn’t effect the product. To just stretch and fold it when I think of it works great and the autolyzing1 of the dough goes a long way.
    • I found that it was easier for me to have the bread sit in the fridge for a few extra days so that I could make the loaf at a convenient time and then bake it a few days later at a convenient time. This process change was just about removing the stress from tight time schedules of normal baked breads.
    • Leaving the loaf out for a short time before baking increases the rise in the bread and makes a fluffier loaf.
    • Having the dutch oven warm up in the oven lets it increase in heat and can steam the bread much better than using a cold dutch oven.
    • Sourdough does not need to be a science. Mess around and be ready to make mistakes. That is the best way to learn.

    The Recipe

    Sourdough Bread for Anyone

    • Servings: 16
    • Print

    A basic no nonsense sourdough bread recipe that anyone can do on any time timetable. Even if you live a crazy life.


    Ingredients

    • 200 grams of Sourdough Discard
    • 300 grams of Filter Water at 70F (or below 85f)
    • 5 grams of Sugar
    • 8 grams of Salt
    • 400 grams of a Flour Blend (I use 133g of Bread Flour, 133g of All Purpose, and 133g of Whole Wheat Flour

    Directions


    1.Add discard to container with water and stir until combined
    2.Add in sugar and salt and stir until combined
    3.Add in flour and stir until combined
    4.Let rest for 1 to 3 hours to allow to autolyze then perform stretch and folds
    5.Let rest in fridge overnight or for a convenient time frame. Perform stretch and folds when you have an opportunity. Repeat until ready to bake
    6.Pull out of fridge a few hours before bake time. Shape into a tight ball and let it rest on parchment paper or bread sling
    7.Preheat oven to 425F and put empty dutch oven in as well
    8.Once heated, score the loaf with your favorite pattern and place into dutch oven
    9.Let it bake for 30 to 40 minutes, then uncover and bake for another 15 to 25 minutes
    10.Let cool on a wire rack and now you have great bread

    Nutrition


    Per Serving:
    105 calories;
    0.5 g fat;
    22 g carbohydrates;
    4 g protein;

    Additional Resources

    Here are a few more resources I like when it comes to bread baking.

    • The greatest bread book of all time.
    • A great video about the effects of autolyzing bread.