Have you been craving a peanut butter cup but worried about the high calories and lack of protein? Then I have the treat for you! These small snack sized protein balls will be perfect! Its the right blend of chocolate and peanut butter that you have been wanting and they won’t ruin your diet. With just a few simple ingredients you probably have in the pantry and just a few minutes of your time, you will have a tasty snack that you’ll want to make often!
Tips and Tricks
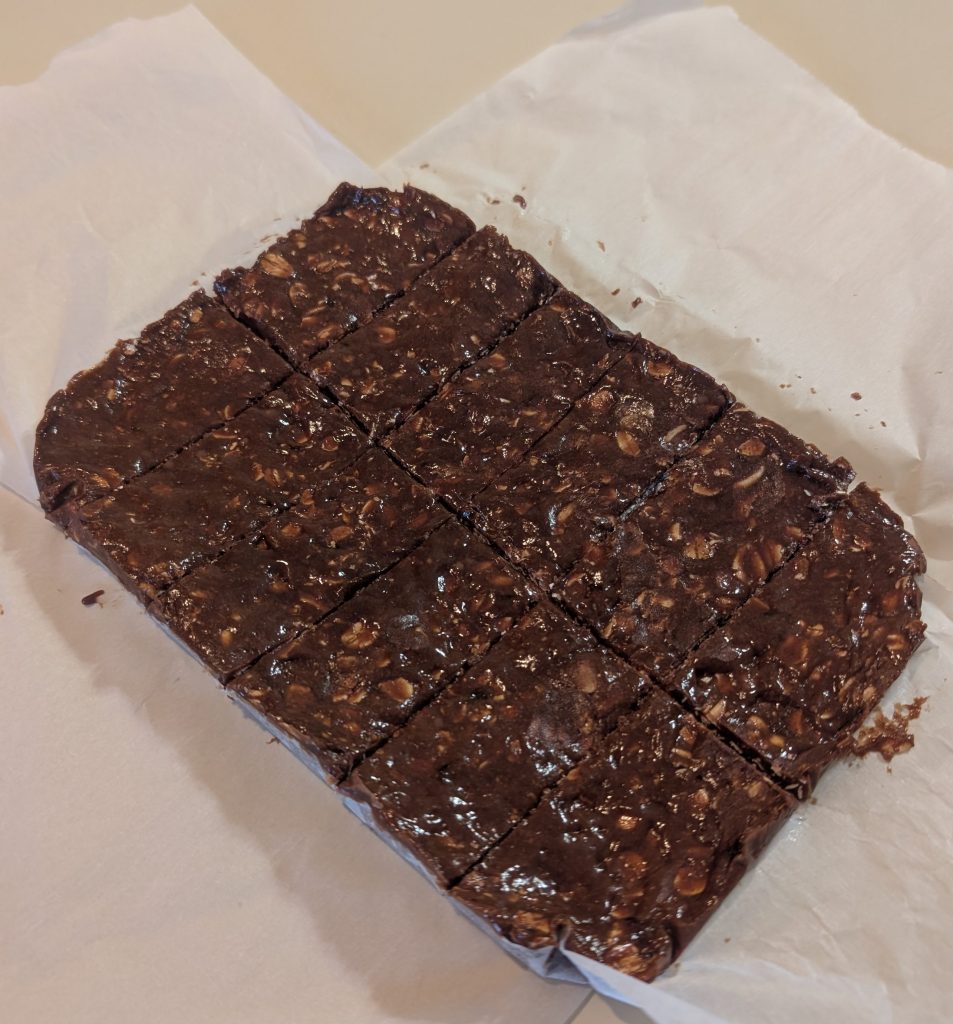
The most common error with this recipe is too much milk. I would recommend adding 20 ml of the milk, mixing, add 5 ml, mixing, and then repeat until these form the correct texture. If you add too much, the batter will be wet and won’t form into balls. If that happens, don’t worry. Just take your batter and press into a sheet tray lined with parchment paper. That way after the chilling, you can pull them out of the freezer and cut them into bite sized chunks. They will taste the exact same but they just wont be as pretty.
It might be worth it to make a double batch because from personal experience, they disappear in a few days. They go even faster if you share them with other people.
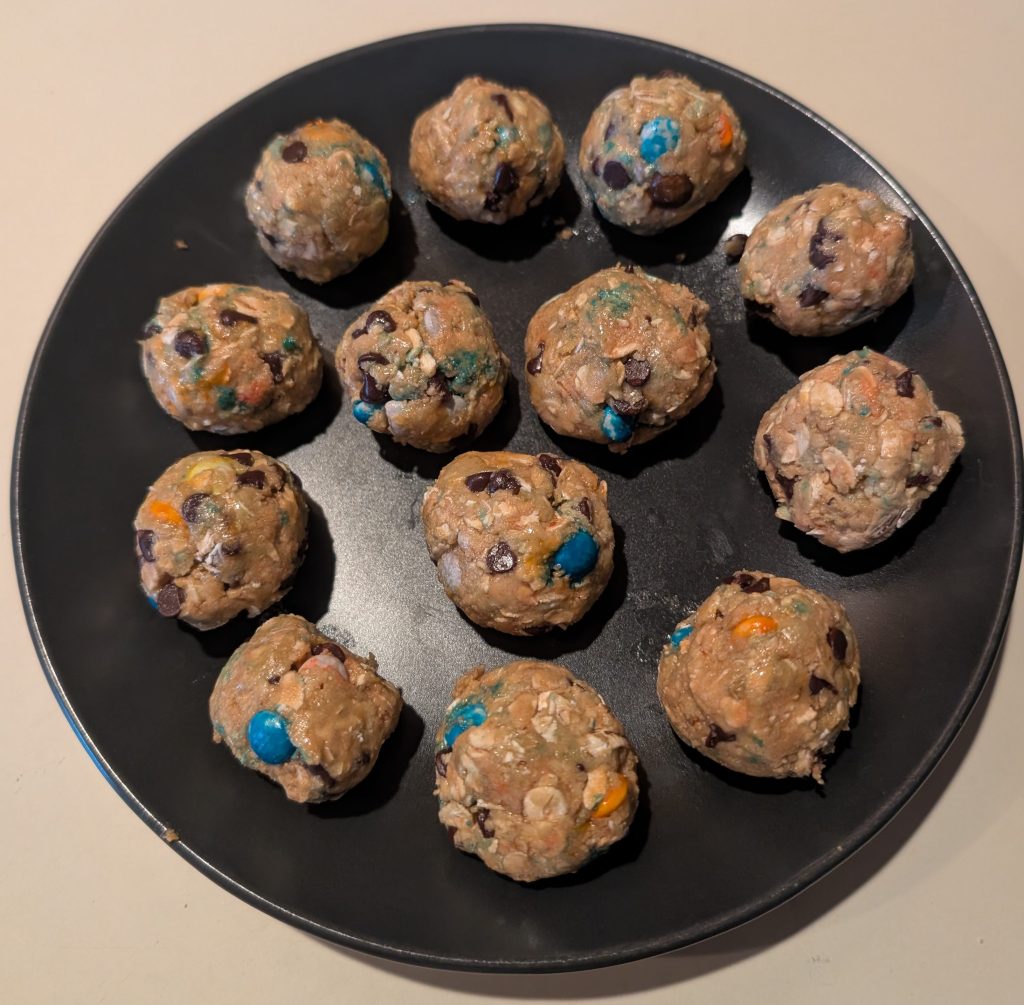
I’m back with a variation on my protein ball recipe! The change with these is the peanut butter protein powder and the mini M&M’s. With that small change, these taste just like a monster cookie but a lot healthier and in bite sized form. Perfect for a quick snack around a workout or to get you through to your next meal. If you love peanut butter, these are the ones for you.
Tips and Tricks
The most common error with this recipe is too much milk. I would recommend adding 20 ml of the milk, mixing, add 5 ml, mixing, and then repeat until these form the correct texture. If you add too much, the batter will be wet and won’t form into balls. If that happens, don’t worry. Just take your batter and press into a sheet tray lined with parchment paper. That way after the chilling, you can pull them out of the freezer and cut them into bite sized chunks. They will taste the exact same but they just wont be as pretty.
I highly recommend trying to find mini peanut butter M&Ms for this recipe. They go almost too perfectly and make it taste so good. I can’t say enough how good it works.
It might be worth it to make a double batch because from personal experience, they disappear in a few days. They go even faster if you share them with other people.
Have you ever needed a small quick snack that won’t destroy your macros for the day? Then I have the perfect little treat for you. These protein balls come together in just a few minutes, high in protein and will give you a boost in energy.
I make these every few weeks because they are great for a quick bite to eat before a workout or a nice snack to have to tide me over between meals. I recommend giving these a shot if you are looking for a healthier alternative for other sweet treat you may be craving if you are on a health or weight loss journey.
If this flavor isn’t for you, I’ll have more recipes out soon with different flavors for you to try. But in the mean time, give these a shot and let me know what you think!
A quick and easy snack that will stay within your protein goals that everyone will love!
Ingredients
40 g (1/2 cup) of Oats
60 g (2 scoops) of Cinnamon Protein Powder
10 g (2 tbsp) of Dutch Cocoa Powder
30 g (2 tbsp) of Mini Chocolate Chips
pinch of Salt
32 g ( 2 tbsp) of Peanut Butter
20 g (1.5 tbsp) of Maple Syrup
40 ml (3 tbsp) of Milk
optional: 2 tbsp of Instant Espresso
Directions
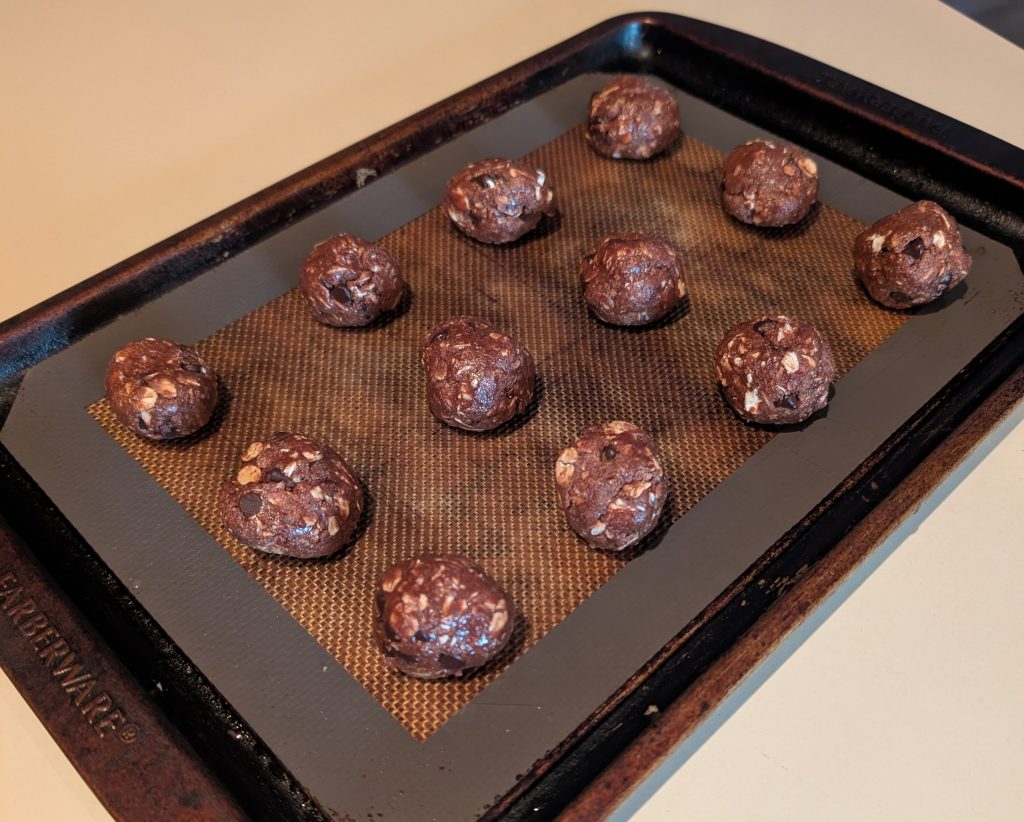
In a small bowl, mix together, Oats, Protein Powder, Cocoa Powder, Mini Chocolate Chips, and Salt. Optionally, add in Instant Espresso as well.
Add in Peanut Butter, Milk, and Maple Syrup and stir to combine. It may seem too dry but keep mixing and it will come together.
Roll into 12 balls and place on a plate or pan. They put that into the freezer to chill for an hour or so.
Nutrition
Per Serving:
65 calories;
5 g protein;
2 g fat;
6 g carbohydrate;
One item to note on this recipe is you do not want to add too much liquid. If you add too much milk these will be really hard to roll into balls. If you do that, don’t worry, there is an easy fix. I take a small container, line it with parchment paper and press the batter into it. I then let it chill as normal but after the hour passes, I cut them into squares and they taste the exact same. A quick fix for a common mistake! It probably happens to me half of the times I make these.
Are you tired of not having a good breakfast option so you skip breakfast and then you end up being extremely hungry by lunch time? You have found the right recipe for you. This breakfast sandwich is meal prep friendly and you can even prep them for freezing. Whenever I feel like having a breakfast sandwich, I take a little extra time and prep a bunch of these and just freeze them after they have cooled off. That way if I am in a rush one morning, I can grab one of these from the freezer and either heat it up at home or even when I get to the office. I’ll be starting my day right and can get it back on track from the rushed morning. I honestly like them more when I reheat them. All the savory flavors are so delicious. There is one thing to note with this recipe that is critical. WRAP THE SANDWICH AFTER YOU MAKE IT. It may seem ridiculous or unnecessary but it makes this sandwich so much better. Once the sandwich is made wrap it in tin foil or parchment paper and let it sit for 5 to 10 minutes. You can stare at it if you want( I’ve done that a few times), but I try to go do my dishes or make a coffee while it sits and this sandwich becomes restaurant quality. It gives everything a chance to combine and the steam softens the bread giving it the perfect texture. Give this thing a try.
Meal Prepping Tips
To make this sandwich meal prep friendly, you just need to make it! After you make the sandwich, it should be already wrapped and ready to go. I use parchment paper to wrap it if I am going to freeze it because when I remove it from the freezer I can immediately put in the microwave and don’t have to unwrap tin foil. I let it cool down to room temperature (20 or so minutes) while wrapped and then place into a freezer safe bag. It can then go into the freezer and you’ll be good to go! To reheat, remove from the freezer, place in the microwave and heat for 30 seconds then flip. Cook it for another 30 seconds, flip and then repeat this process until warmed up to your desired temperature. This last for 5 days in the fridge or up to a month in the freezer. They probably could go longer in the freezer but I haven’t tested it.
Ingredient Swaps and Substitutions.
Here are some of my favorite proteins to put with the eggs.
Ground Sausage
Bacon
Sliced Ham
Sliced Turkey
Sausage Patty
I’ve found any of these work great in this recipe but I personally don’t like the sausage patty in the sandwich when its reheated from frozen. It takes a touch too long to get warm in the microwave and then the rest of the sandwich feels like lava. I like the ground sausage and the sliced meat to work the best for freezing. I’ll always take some more ideas for proteins to put on this sandwich in the comments below.
As for the other ingredients, any melting cheeses work great. I either you cheddar or mozzarella but a pepper jack cheese can add some really nice flavors and a touch of spice.
For the bread, I personally use my own sourdough bread (you can find the recipe here). The only change I make to that recipe is I bake the bread in a bread tin covered in tin foil instead of a Dutch oven. I’ve found this makes a much softer bread and better for this sandwich. If you don’t feel like making bread or that’s not your thing, no worries. Use your favorite bread, or try this recipe with an English Muffin, or bagel. All of these will work but you may have to adjust the amount of egg you put in the sandwich.
This meal prep friendly sandwich will start your day off right. The only issue I have with it is I never seem to make enough of them!
Ingredients
2 Slices of Bread(Bagel or English Muffin works as well)
3 Eggs
1/4 Pound (100 grams) of Ground Sausage or other Protein
1 Slice of Cheese or 20 grams of Shredded Cheese
Salt to Taste
Pepper to Taste
One 15″ x 15″ Tin Foil or Parchment Paper
Optional: Additional Protein
Directions
Start by cooking your sausage to package instructions. Make sure it is cooked through. If you are using a different protein, heat it up slightly in the pan or cook through if raw.
Remove the sausage from the pan once cooked and place in a bowl or plate for later.
Toast your bread in either the toaster or the pan and cook to desired darkness.
Crack the 3 eggs into the pan and scramble. Add in pepper and salt to taste and stir. Cook the eggs until slightly under done and then add the cheese. If you are using ground sausage add it in as well. Stir to combine. Turn off the heat.
Time to assembly. Start with one piece of bread, then place on a protein, then the egg mixture, any cheese if not already added. Then the other piece of bread.
Now place the made sandwich on the parchment paper in the center. Wrap the paper around the sandwich any way you see fit. Just make sure no part of the sandwich is showing after it is wrapped. Use an extra piece of parchment if needed.
Let the sandwich sit for 5 to 10 minutes and then feel free to enjoy. If you are meal prepping this, let it sit for a bit longer until room temperature. Then place into a freezer safe bag and place into the freezer to be enjoyed at a later date.
Nutrition
Per Serving:
675 calories;
32 g fat;
49 g carbohydrates;
50 g protein;
One last thing to note on this sandwich. It is a rather large sandwich and definitely could be split into two servings and then enjoyed with a bowl of fruit on the side. That is a great option for a person if they can not eat a large meal first thing in the day. Either way, I hope you enjoy this recipe. Let me know if you have any questions or have any suggestions!
These are my new obsession. I have made them every weekend for a month straight now and I think I like them more and more every time I eat them. They are super easy to make and fit directly into my health goals. I can make a batch of these and have breakfast everyday for the week without the hassle of making a healthy breakfast each morning before work. These have saved me a ton of time each morning.
These egg cups are high protein, meal prep friendly, and are super easy to make. They are as easy as they look. Put a slice of ham or turkey into a muffin tin, crack in an egg into each one, add salt, pepper, and cheese, and then bake. Doesn’t get much easier than that for meal prep. And trust me, I’ve done a lot of meal prep over the year. Nothing beats the ease and simplicity. You also can’t beat the macros unless you are having a protein shake but these are much tastier and more disable than having protein shakes everyday. You and your gut will thank you for eating these. Let’s get into the recipe.
A quick, high protein breakfast is a great way to start the day. This recipe is a go to for my weekly meal prep.
Ingredients
12 Eggs
450 grams or 1 pound of Ham or Turkey Slices
30 grams of Shredded Cheese
Salt
Pepper
Directions
Spray a standard muffin tin with cooking spray and preheat oven to 375 F 2. Tuck a piece of ham or turkey into each muffin tin almost like a muffin liner
Crack 1 egg into each muffin tin
Put a small pinch of salt and a small crack of black pepper on each cup
Break each yolk with a give it a small stir to mix so salt and pepper are not completely at the top
Add a small amount of cheese to each cup
Once oven is preheated, place tray into oven and bake for 25 to 30 minutes or egg is cooked through.
Pull out of the oven and let cool for 10 to 15 minutes. They are now ready to eat or let them cool further and store them in a container for prep for the week.
Nutrition
Per Serving:
260 calories;
15 g fat;
3 g carbohydrates;
25 g protein;