Tag: food

  • Sourdough Bagels

    This recipe is being posted by popular request! I had a large amount of people asking me if I could make bagels. I had made yeasted bagels in the past but I wanted to switch that recipe to sourdough and I’m so glad I did. These taste absolutely amazing. I have been either making breakfast sandwiches or doing cream cheese bagels and its been highlights in my day.

    Tips and Tricks

    I have a few tips and tricks with this recipe. The best way to get more flavor is for the dough to rest longer in the fridge after making it. Its easy to do but just requires a little foresight. I would also recommend watching a few videos on bagel shaping so you can get a feel for how to do it. It can be a bit tricky but after a few tries you’ll have it nailed down. The biggest issue I had was over proofing the bagels once they were shaped. If you do that, then you will have very flat bagels. They still taste good but functionally don’t work too well.

    Toppings and Substitutions

    For toppings, I personally love a plain bagel but here are some other really good options.

    • Everything Bagel Seasoning
    • Sesame Seeds
    • Flakey Salt
    • Pumpkin Seeds
    • Poppy Seeds

    One optional substitution you can make is to make these bagels whole wheat. Replace 1/2 cup of the bread flour with your favorite whole wheat flour and you now have whole wheat bagels. I like to make these for a bit of variety when I have bagels.
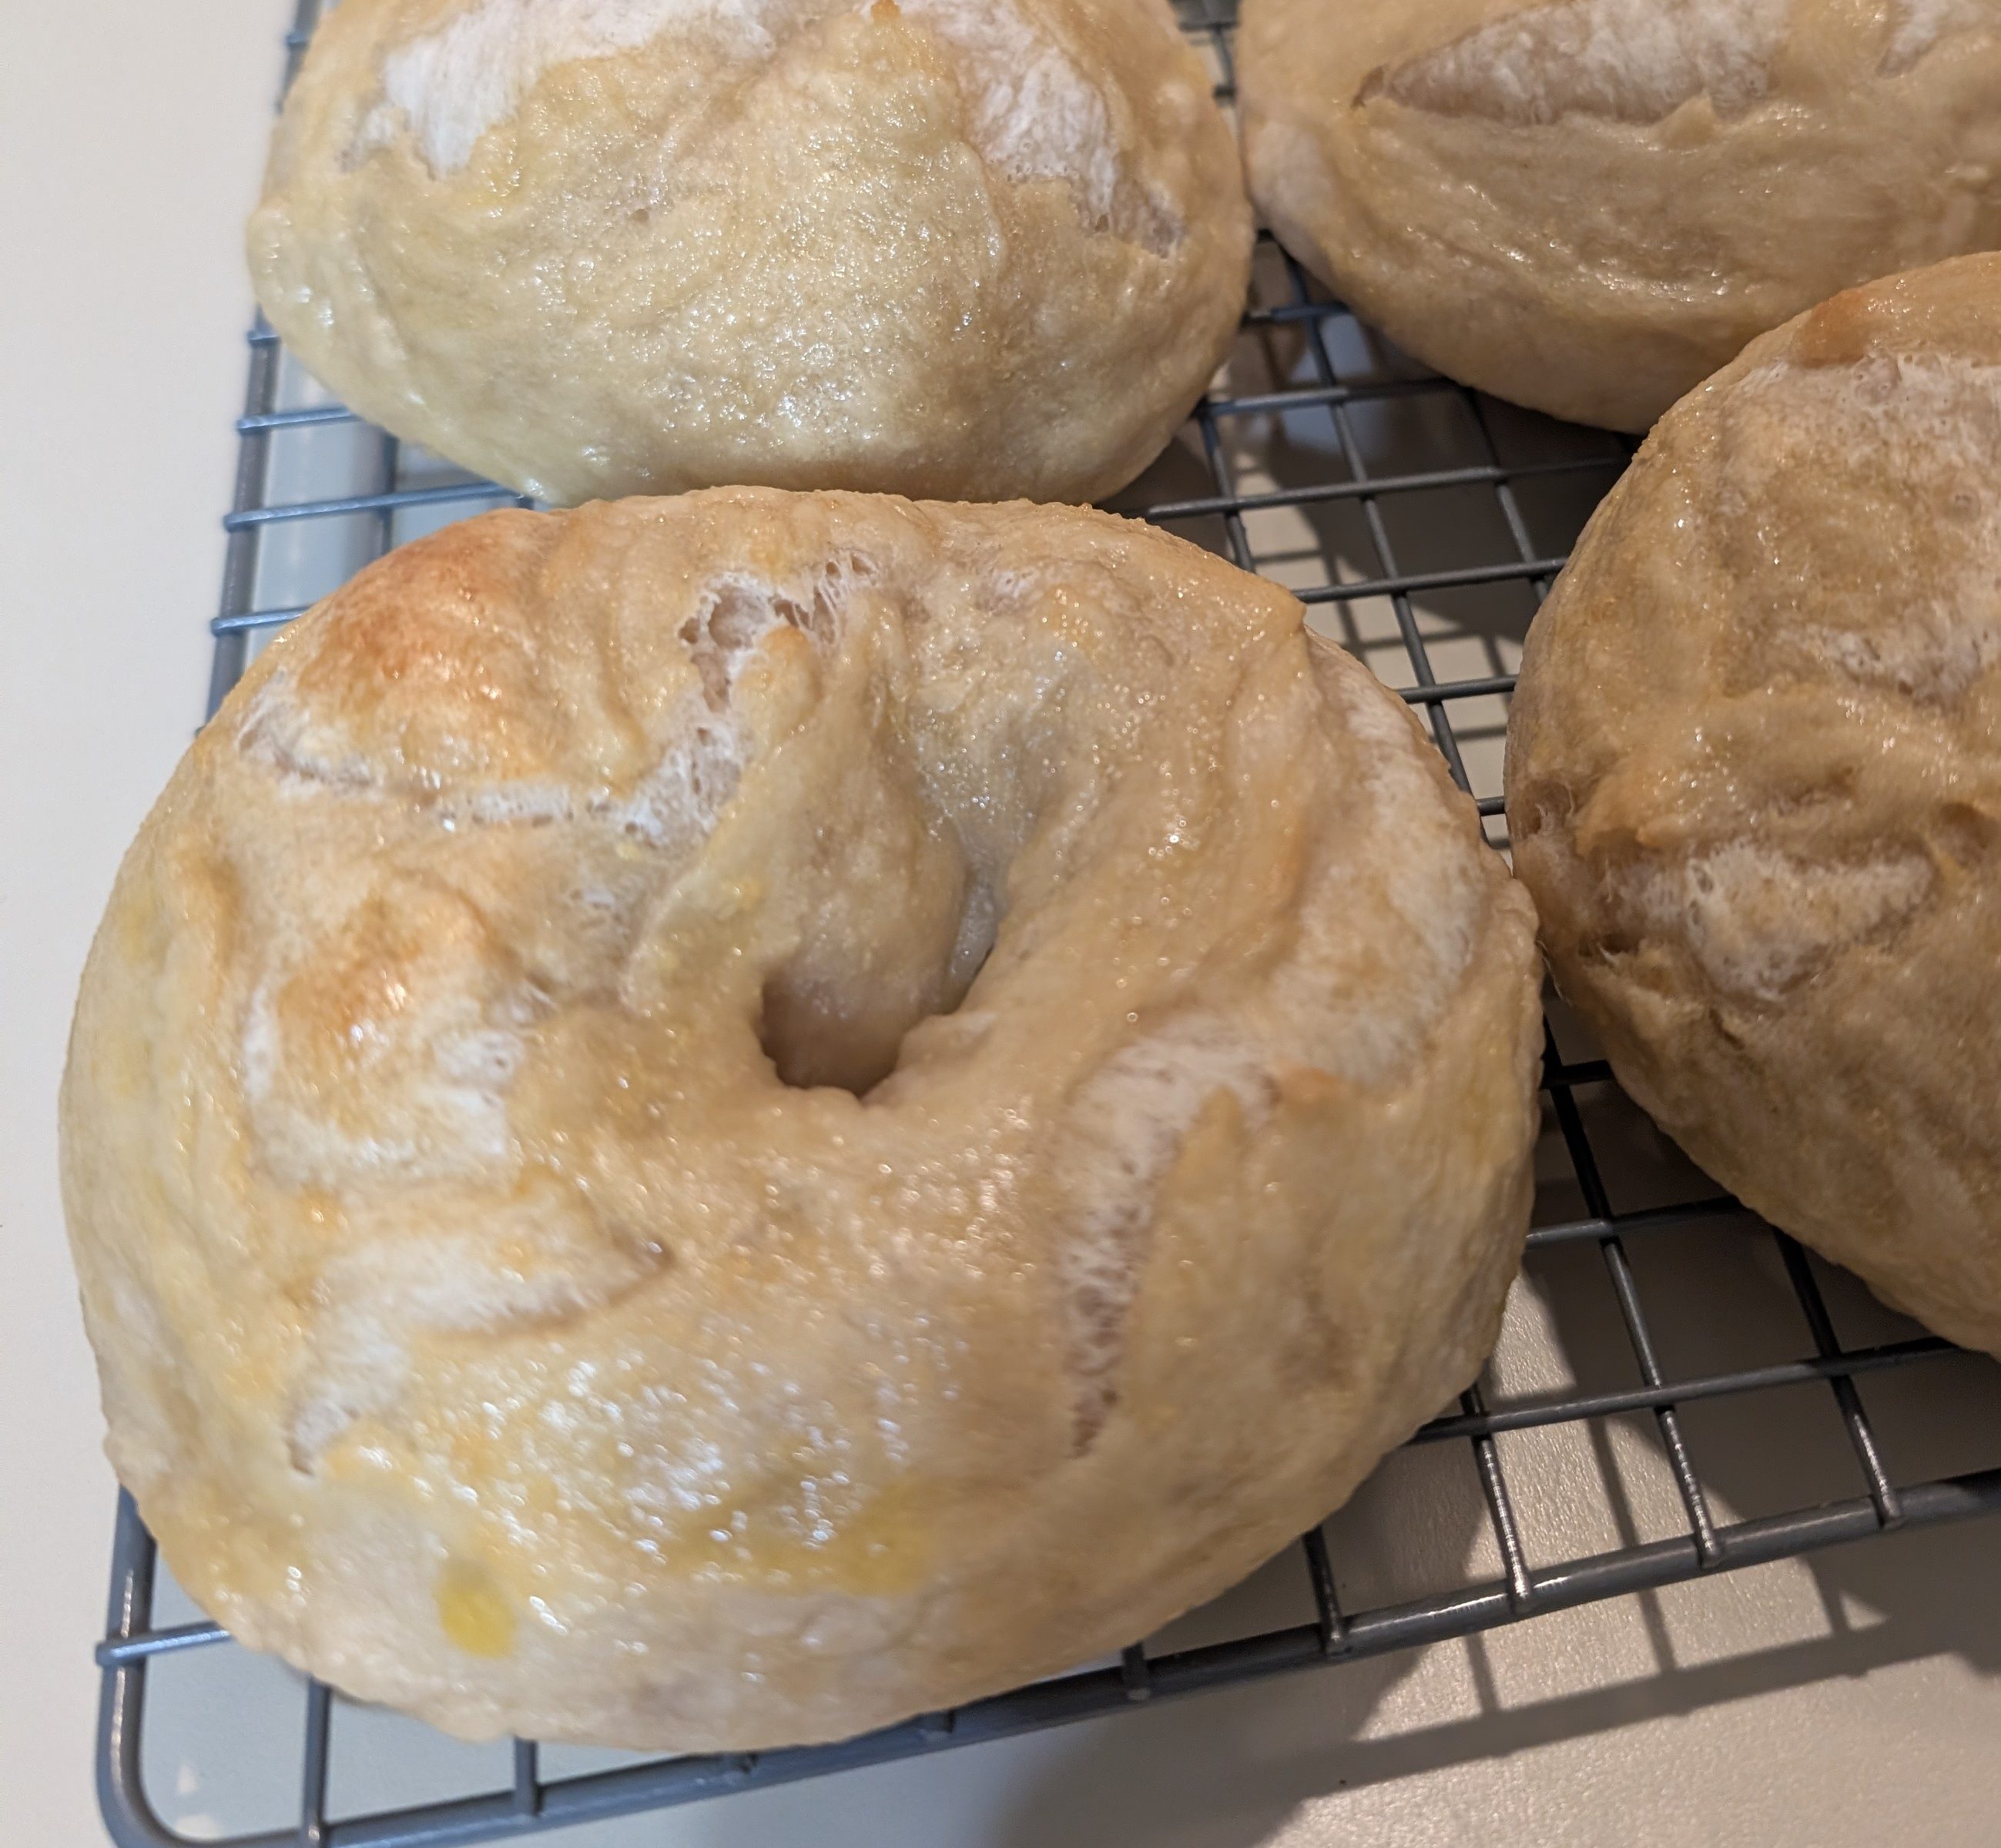
    Sourdough Bagels

    • Servings: 5 bagles
    • Print

    A perfect vehicle for cream cheese or to make an amazing breakfast sandwich.


    Ingredients

      Dough
    • 2 cups (260 grams) of Bread Flour
    • 100 grams of Sourdough Discard
    • 3/4 cup (180 grams) of Warm Water
    • 1 Tablespoon (15 grams) of Brown Sugar
    • 1 Teaspoon (4 grams) of Salt
    • For Boiling and Topping

    • 2 quarts of Water
    • 1/4 cup (50 grams) of Brown Sugar
    • 1 Tablespoon (12 grams) of Salt
    • 1 Egg (50 grams) and a tablespoon of water
    • Preferred Bagel Toppings

    Directions

    1. In a large bowl add in sourdough discard, water, brown sugar, and salt. Mix until combined. Then add in the flour and fold until a shaggy ball of dough appears. About 3 minutes. Let it rest covered for 15 minutes to 1 hour.
    2. After resting knead the dough for a few minutes and then shape into a ball. Place in an oiled bowl or container that is more than twice the size of the dough ball. It will rise a lot and you don’t want a dough explosion.
    3. 3.Cover and place in the fridge overnight or up to 2 days. Degas and knead the dough at least once a day if doing a rest longer than overnight.
    4. After the rest, pull the dough out of the fridge and let it rest for 2 hours. This will allow it to come to room temperature and make it easier to shape. Once warmed up, Lightly flour your work surface and shape the dough into a ball. Split the ball into 5 even chunks.
    5. Shape each dough chunk into a small ball. Do this by laying it flat with your hand, and then pull one edge to the middle, turn and repeat until a ball form. Roll in a little flour and place seam side up on your work surface. Let it rest and shape the other 4 dough balls.
    6. Put a few droplets of water on the seam and then place the seam down on an unfloured work surface. It should stick slightly. Then cup the ball with your hand and spin it on the work surface. This will tighten the ball. Roll in flour and place of to the side. Do the other 4 and once done let them rest for 10 minutes.
    7. Grab the first dough ball and poke a hole in the center. Push through and then expand the hole until it is double the size you think it should be for a bagel. It will shrink. Set aside and do the others.
    8. Once all of them are shaped. Time to get some water boiling. While the water is starting to warm up in the pot. Add in the sugar and salt and stir. Once the water is boiling, place in one bagel. Let it boil on one side for a minute and then flip. Let it boil for another minute. Remove with a slotted spoon or spatula and let the water drip off. Place on a baking spray lined baking sheet and repeat with the other bagels.
    9. Once all the bagels are boiled, preheat the oven to 425F. Make up an egg wash and with a pastry brush, paint the bagels. Add on any toppings you would like. Place in the oven for 25 to 30 minutes.
    10. Remove from pan and let cool on a cooling rack until room temperature. They are good covered at room temperature for up to a week or freezing them works as well. Enjoy!

    Nutrition


    Per Serving:
    225 calories;
    0g fat;
    48g carbohydrates;
    9g protein;

  • Pumpkin Cheesecake Bars

    I first saw these bars at a Friendsgiving party and I absolutely fell in love with them immediately. Its all the best parts of pumpkin pie but fancier and more complex flavors. The tang from the sour cream compliments the sugar in the pumpkin pie and then the crust is perfect to bite through giving a great experience all the way. For someone who wants something a bit different for Thanksgiving but still wants a pumpkin dessert, these are the treat for you. I made them for Thanksgiving this year and I am sure I will be making them again next year because they were a big hit. I ate three the night I first had them and three more on Thanksgiving. They are way too addicting, maybe you shouldn’t make them for your Thanksgiving and you should just make them for yourself instead. You won’t regret it.

    These are pretty straight forward and pretty fun to make. The only tips and tricks I have for this one is a substitution for the vanilla extra for vanilla bean paste but that can be hard to find. Either work! The other item to note is the optional cinnamon boost. I found without the extra cinnamon they were a bit lacking but I made it optional because not everyone likes a lot of cinnamon. The last item for these is maybe consider a double batch because they will go quick!

    Pumpkin Cheesecake Bars

    • Servings: 16 bars
    • Print

    A remix of a classic. These are perfect if you like pumpkin pie but want something a little fancier


    Ingredients

      Crust Layer
    • 2 cups (240 grams) of all-purpose flour
    • 1 cup (113 grams) of powdered sugar
    • 2 sticks (220 grams) of softened unsalted butter
    • Pumpkin Layer

    • 8 oz (225 grams) of softened cream cheese
    • 3/4 cup (150 grams) of sugar
    • 15 oz (425 grams) of pumpkin puree
    • 2 teaspoons (5 grams) of pumpkin pie spice
    • 2 teaspoons (5 grams) of cinnamon powder(optional)
    • 3 eggs (150 grams) at room temperature
    • Cheesecake Topping

    • 2 cups (450 grams) of sour cream
    • 1/2 cup (100 grams) of sugar
    • 1/2 teaspoon (3 grams) of vanilla extract

    Directions

    1. Preheat your oven to 350 degrees and then line a 9×9 baking pan with parchment paper.
    2. In a large bowl mix together the flour and sugar for the crust until combined. Then cut the softened butter into small cubes and incorporate the butter into the flour mixture until a wet sand like mixture forms. About 5 mins or so.
    3. Press the dough into the pan lined with parchment until an even layer forms. If the dough is too thick for your liking, remove some and use in some test baking or to have a small snack for yourself. Just make sure you have an even layer in your pan.
    4. Place the pan in the oven and bake for 25 to 30 minutes. It should start to be turning brown.
    5. In a large bowl or in a stand mixer, mix together softened cream cheese, sugar, pumpkin puree, pumpkin pie spice, cinnamon, and eggs until well combined. Use the paddle in a stand mixer or beaters with an electric mixer.
    6. Pour this over the baked crust right after it came out of the oven and bake for 35 to 40 minutes until it is set and not moving in the center.
    7. Mix together the sour cream, sugar and vanilla in a stand mixer or with an electric mixer until a smooth runny mixture forms. Pour it over the baked pumpkin layer and bake for another 5 to 10 minutes.
    8. Remove from the oven and cool completely for at least 2 hours.
    9. Cut into 16 squares and serve them cold. Enjoy!

    Nutrition


    Per Serving:
    310 calories;
    20g fat;
    31g carbohydrates;
    6g protein;

  • Holiday Rolls

    I first made these rolls to go with a meal I was making for myself and the first thought I had was; Some turkey would be amazing with these rolls, like at Thanksgiving. Later that same month, I was asked to make some rolls for a Thanksgiving party I was going to and they were a massive hit. Everyone at the party complimented me on the rolls. A few years later, I don’t even get asked to make the rolls, they are just expected and people look forward to them. And I am happy to make them.

    These rolls make the perfect side for your holiday meals. I make them at both Thanksgiving and Christmas. They are great for mini sandwiches with leftover turkey or using to dip into that gravy you have on your plate. Once you try them, you’ll know exactly what you want to use them for. And I am sure you will be making them for many years to come.

    Holiday Rolls

    • Servings: 16 rolls
    • Print

    Make these one time and from then on you will be known as the person who made the best rolls ever.


    Ingredients

      Dough
    • 5 cups (600 grams) of All-Purpose Flour
    • 1 1/3 cup (320 grams) of Milk
    • 1 stick (112 grams) of Softened Butter
    • 1/2 cup (100 grams) of Granulated Sugar
    • 2 teaspoons (6 grams) of Active Dry Yeast
    • 1 tablespoon (12 grams) of Salt
    • 2 Eggs (100 grams) at Room Temperature
    • Toppings

    • 2 tablespoon (28 grams) of Melted Butter
    • Flakey Salt

    Directions

    1. Mix together the flour, salt, and sugar in a large bowl. In a separate container warm the milk to between 80F to 95F and then stir in the yeast and let rest for 10 minutes. This is to test the yeast is still good. If it does not foam, discard and get new yeast and milk.
    2. Add in the milk, yeast and eggs into the flour mixture and knead until combined. This will be sticky for a while but do this until a shaggy dough forms.
    3. Add in the butter and knead the dough for 5 minutes until the butter is incorporated into the dough. A stand mixer can be used for this step as well. Let the dough rest for 10 minutes in the bowl.
    4. Sprinkle some flour onto a work surface and knead the dough on the surface for a few minutes. Shape the dough into a ball by pulling the dough across the work surface. Place back into a bowl and let rest for 1 to 2 hours.
    5. Once the dough has rested, take it out of the bowl and divide into 16 pieces all about 70 grams. I normally just eye ball 16 pieces by dividing the dough chunks in halves until I get to 16. Form them into tight balls and place on a grease lined baking sheet and cover. Let rest for another 1 to 2 hours.
    6. Preheat the oven to 400F. Once warmed placed the buns in the oven uncovered for about 10 to 12 minutes. They should be golden brown on top and have an internal temperature of 202F.
    7. Optionally, you may melt 2 tablespoons of butter and brush it on top of the buns and sprinkle a little bit of salt on top.
    8. Enjoy them warm and with friend and family!

    Nutrition


    Per Serving:
    225 calories;
    6g fat;
    36g carbohydrates;
    5g protein;

  • Sourdough Pancakes(or Waffles!)

    Have some extra sourdough discard that you don’t know what to do with? Make some pancake batter! This is an excellent use for that sourdough discard. The little bit of tang from the sourdough provides the perfect contrast to maple syrup or fruit. It creates a delightful breakfast that I love when I want to make something a bit fancier or have some extra fun. Give these a try the next time you make pancakes or waffles!

    Tips and Tricks

    • Add fruits, maple syrup, or maybe even whipped cream for a sweet addition! Mini chocolate chips for even more fun!
    • This recipe also works to make waffles in a waffle iron. No modifications to the recipe!
    • I like to bulk prep these from time to time so I will have enough for the rest of the week or freeze the extras to have a quick breakfast on those busy mornings.

    The Recipe

    Sourdough Pancakes

    • Servings: 10 6in Pancakes
    • Print

    One of my favorite weekend breakfasts when I want to make something a bit fancier than normal.


    Ingredients

    • 190g (1 1/2 cups) of All Purpose Flour
    • 24g (2 tbsp) of Sugar
    • 3g (1/2 tsp) of Salt
    • 240g (1 cup) of Sourdough Discard or Active
    • 2 Eggs (100g)
    • 240 ml (1 cup) of Milk(more may be needed)
    • 42g (3 tbsp) of Unsalted Butter Melted

    Directions

    1. The night before making, mix together wet ingredients(Discard, Eggs, Milk, and Melted Butter) until smooth.
    2. Add in the rest of the ingredients and stir until well combined.
    3. Let it rest in the refrigerator overnight.
    4. In the morning stir well before use.
    5. Warm up a frying pan. Once warm at a little butter to the pan to prevent sticking.
    6. Pour 1/3 cup of batter into the pan. Cook on this side until bubbles start to form and then flip. Cook for another minute to three to finish cooking.
    7. Once finished cooking, place on a plate and they are ready to serve.
    8. Enjoy!

    Nutrition

    Per Serving(One 6″ Pancake): 150 calories; 5.5 g protein; 5 g fat; 21 g carbohydrate;

  • Simple Whipped Cream

    Here’s a super simple recipe that I always seem to need just to check the ratios. It is a quick and easy recipe that will only take a few minutes but those few minutes make such a better product than anything you can get from the store. Just throw all the ingredients into a bowl and whisk together and you have the start of a great dessert, a topping for your coffee or pancakes, or just eat it as a treat!

    Tips and Tricks

    • Any tips of sugar will work with this recipe but powdered sugar will give the most consistent results. I mostly use powdered sugar but if the whipped cream will be going on a cinnamon coffee, I will use brown sugar. It is a fun factor to mess with and try with different things!
    • Another fun swap is to change out the vanilla extract for different syrups. I’ve used both mint and a cinnamon syrup with this recipe to change up the flavors. It makes it really fun then!
    • I honestly love to make this and pair it with fruit to make a fun dessert. It tastes like a dessert and not completely terrible for you. It makes for a good middle ground.
    • Be careful not to overwhip the heavy cream as that can create butter and I’m guessing that’s not what your looking for.

    The Recipe

    Simple Whipped Cream

    • Servings: 2 Cups of Whipped Cream
    • Print

    With just three ingredients and a few minutes you can have perfect whipped cream that has so many different uses!


    Ingredients

    • 240 ml (1 cup) of Heavy Whipping Cream
    • 20 g (2.5 tbsp) of Powdered Sugar
    • 1/2 tsp of Pure Vanilla Extract

    Directions

    1. Add in all ingredients into a bowl and with a stand mixer or hand held mixer whisk on medium high speed for 3 to 5 minutes.
    2. You’ll know when its close when you stop mixing for a moment and the cream will have these peaks that start to stand on there own.
    3. Once the peaks fully stand and don’t drop very much, you have made whipped cream!
    4. Place into a container and refrigerator for up to 24 hours.

    Nutrition


    Per Serving(2 Tbsp of Whipped Cream):
    50 calories;
    0 g protein;
    5.5 g fat;
    0.5 g carbohydrate;

  • Peanut Butter Cup Protein Balls

    Have you been craving a peanut butter cup but worried about the high calories and lack of protein? Then I have the treat for you! These small snack sized protein balls will be perfect! Its the right blend of chocolate and peanut butter that you have been wanting and they won’t ruin your diet. With just a few simple ingredients you probably have in the pantry and just a few minutes of your time, you will have a tasty snack that you’ll want to make often!

    Tips and Tricks

    • The most common error with this recipe is too much milk. I would recommend adding 20 ml of the milk, mixing, add 5 ml, mixing, and then repeat until these form the correct texture. If you add too much, the batter will be wet and won’t form into balls. If that happens, don’t worry. Just take your batter and press into a sheet tray lined with parchment paper. That way after the chilling, you can pull them out of the freezer and cut them into bite sized chunks. They will taste the exact same but they just wont be as pretty.
    • It might be worth it to make a double batch because from personal experience, they disappear in a few days. They go even faster if you share them with other people.

    The Recipe

    Monster Cookie Protein Balls

    • Servings: 12 Balls
    • Print

    This recipe is like if a monster cookie was healthy and way quicker to make. They are worth a try if you like small little snacks


    Ingredients

    • 40 g (1/2 cup) of Oats
    • 30 g (1 scoop) of Peanut Protein Powder
    • 30 g (1 scoop) of Chocolate Protein Powder
    • 30 g (2 tbsp) of Mini Chocolate Chips
    • pinch of Salt
    • 32 g ( 2 tbsp) of Peanut Butter
    • 20 g (1.5 tbsp) of Maple Syrup
    • 35 ml (3 tbsp) of Milk

    Directions

    1. In a small bowl, mix together, Oats, Protein Powder, Mini Chocolate Chips, and Salt.
    2. Add in Peanut Butter, Milk, and Maple Syrup and stir to combine. It may seem too dry but keep mixing and it will come together.
    3. Roll into 12 balls and place on a plate or pan. They put that into the freezer to chill for an hour or so.
    4. Once chilled, remove and place in a container. Enjoy your tasty snack!

    Nutrition


    Per Serving:
    65 calories;
    5 g protein;
    2 g fat;
    6 g carbohydrate;

  • Monster Cookie Protein Balls

    I’m back with a variation on my protein ball recipe! The change with these is the peanut butter protein powder and the mini M&M’s. With that small change, these taste just like a monster cookie but a lot healthier and in bite sized form. Perfect for a quick snack around a workout or to get you through to your next meal. If you love peanut butter, these are the ones for you.

    Tips and Tricks

    • The most common error with this recipe is too much milk. I would recommend adding 20 ml of the milk, mixing, add 5 ml, mixing, and then repeat until these form the correct texture. If you add too much, the batter will be wet and won’t form into balls. If that happens, don’t worry. Just take your batter and press into a sheet tray lined with parchment paper. That way after the chilling, you can pull them out of the freezer and cut them into bite sized chunks. They will taste the exact same but they just wont be as pretty.
    • I highly recommend trying to find mini peanut butter M&Ms for this recipe. They go almost too perfectly and make it taste so good. I can’t say enough how good it works.
    • It might be worth it to make a double batch because from personal experience, they disappear in a few days. They go even faster if you share them with other people.

    The Recipe

    Monster Cookie Protein Balls

    • Servings: 12 Balls
    • Print

    This recipe is like if a monster cookie was healthy and way quicker to make. They are worth a try if you like small little snacks


    Ingredients

    • 40 g (1/2 cup) of Oats
    • 60 g (2 scoops) of Peanut Protein Powder
    • 30 g (2 tbsp) of Mini Chocolate Chips
    • 30 g (2 tbsp) of Mini M&Ms
    • pinch of Salt
    • 32 g ( 2 tbsp) of Peanut Butter
    • 20 g (1.5 tbsp) of Maple Syrup
    • 35 ml (3 tbsp) of Milk

    Directions

    1. In a small bowl, mix together, Oats, Protein Powder, Mini Chocolate Chips, Mini M&ms, and Salt.
    2. Add in Peanut Butter, Milk, and Maple Syrup and stir to combine. It may seem too dry but keep mixing and it will come together.
    3. Roll into 12 balls and place on a plate or pan. They put that into the freezer to chill for an hour or so.

    Nutrition


    Per Serving:
    65 calories;
    5 g protein;
    2 g fat;
    6 g carbohydrate;

  • Tiramisu Protein Balls

    Have you ever needed a small quick snack that won’t destroy your macros for the day? Then I have the perfect little treat for you. These protein balls come together in just a few minutes, high in protein and will give you a boost in energy.

    I make these every few weeks because they are great for a quick bite to eat before a workout or a nice snack to have to tide me over between meals. I recommend giving these a shot if you are looking for a healthier alternative for other sweet treat you may be craving if you are on a health or weight loss journey.

    If this flavor isn’t for you, I’ll have more recipes out soon with different flavors for you to try. But in the mean time, give these a shot and let me know what you think!

    The Recipe

    Tiramisu Protein Balls

    • Servings: 12 Balls
    • Print

    A quick and easy snack that will stay within your protein goals that everyone will love!


    Ingredients

    • 40 g (1/2 cup) of Oats
    • 60 g (2 scoops) of Cinnamon Protein Powder
    • 10 g (2 tbsp) of Dutch Cocoa Powder
    • 30 g (2 tbsp) of Mini Chocolate Chips
    • pinch of Salt
    • 32 g ( 2 tbsp) of Peanut Butter
    • 20 g (1.5 tbsp) of Maple Syrup
    • 40 ml (3 tbsp) of Milk
    • optional: 2 tbsp of Instant Espresso

    Directions

    1. In a small bowl, mix together, Oats, Protein Powder, Cocoa Powder, Mini Chocolate Chips, and Salt. Optionally, add in Instant Espresso as well.
    2. Add in Peanut Butter, Milk, and Maple Syrup and stir to combine. It may seem too dry but keep mixing and it will come together.
    3. Roll into 12 balls and place on a plate or pan. They put that into the freezer to chill for an hour or so.

    Nutrition


    Per Serving:
    65 calories;
    5 g protein;
    2 g fat;
    6 g carbohydrate;

    One item to note on this recipe is you do not want to add too much liquid. If you add too much milk these will be really hard to roll into balls. If you do that, don’t worry, there is an easy fix. I take a small container, line it with parchment paper and press the batter into it. I then let it chill as normal but after the hour passes, I cut them into squares and they taste the exact same. A quick fix for a common mistake! It probably happens to me half of the times I make these.

  • Yogurt Fruit Bowl

    This recipe has been in my daily meal plan for over 4 years at this point and I don’t see it leaving anytime soon. It’s so good, so simple, high protein, filled with nutrients, and a tasty snack. I eat it everyday as a mid morning snack, pre workout or post workout snack. It uses Greek yogurt, chia seeds, protein powder, and any fruit that is bite sized. What’s even better about this recipe is that it is extremely meal prep friendly. I make a week’s worth of these every time I make them and they store all week long in the fridge.

    In the picture above, I added an additional chocolate chips and chopped walnuts for a little extra fun but I normally don’t add them. One nice thing about these bowls is that you can add almost anything that sounds good and it’ll probably work great.

    Nutritional Notes and Tips

    The Greek yogurt provides a great amount of protein, vitamins, and probiotics. These are all great for a healthy gut and promoting a healthy lifestyle.

    The chia seeds in this recipe provide Omega 3 fatty acids at recommended daily intake as well as additional fats and protein. They also add a nice texture to the yogurt bowl.

    I use a collagen based protein powder to diversify my protein sources but just about any protein powder will work. The protein powder of course adds protein but it also adds the main flavor of the bowl. I personally use a chocolate protein powder(Vital Protein Brand) most of the time but I have also used peanut butter, cinnamon, lemon, marshmallow and so many more. I really like chocolate protein powder as chocolate goes with just about any fruit and makes this taste like a dessert.

    As for the fruit in this bowl, I like to use berries. I’ve used chopped up strawberries, blueberries, black berries, cherries, and bananas. I use to chop fresh fruit for this bowl and that definitely works but I recently started using frozen fruit. It makes the process so much quicker and easier that its now my go to. You can finally use up that frozen fruit in your freezer that you have been meaning to use!

    In the picture below, you can see how I meal prep all of these for a week. I use a medium sized container and its almost a perfect size. I’ll prep anywhere from 5 to 9 of these bowls at a time but I would try a few less than that first and see what works for you. Let’s get into the recipe.

    Yogurt Fruit Bowl

    • Servings: 1 Bowl
    • Print

    A meal prep friendly yogurt bowl that you will want to eat for a long time!


    Ingredients

    • 170 g (3/4 cup) of Non Fat Greek Yogurt
    • 25 g of Protein Powder
    • 15 g of Chia Seeds
    • 50 g of Fruit of Choice

    Directions

    1. Get your meal prep container or bowl ready to go.
    2. Scoop in your greek yogurt, chia seeds, and protein powder. Mix until combined.
    3. Chop up your fruit if you need otherwise place it into the bowl.
    4. You are now ready to eat or store in the fridge for up to a week.

    Nutrition


    Per Serving:
    265 calories;
    5 g fat;
    19 g carbohydrates;
    37 g protein;

  • My Favorite Breakfast Sandwich

    Are you tired of not having a good breakfast option so you skip breakfast and then you end up being extremely hungry by lunch time? You have found the right recipe for you. This breakfast sandwich is meal prep friendly and you can even prep them for freezing. Whenever I feel like having a breakfast sandwich, I take a little extra time and prep a bunch of these and just freeze them after they have cooled off. That way if I am in a rush one morning, I can grab one of these from the freezer and either heat it up at home or even when I get to the office. I’ll be starting my day right and can get it back on track from the rushed morning. I honestly like them more when I reheat them. All the savory flavors are so delicious. There is one thing to note with this recipe that is critical. WRAP THE SANDWICH AFTER YOU MAKE IT. It may seem ridiculous or unnecessary but it makes this sandwich so much better. Once the sandwich is made wrap it in tin foil or parchment paper and let it sit for 5 to 10 minutes. You can stare at it if you want( I’ve done that a few times), but I try to go do my dishes or make a coffee while it sits and this sandwich becomes restaurant quality. It gives everything a chance to combine and the steam softens the bread giving it the perfect texture. Give this thing a try.

    Meal Prepping Tips

    To make this sandwich meal prep friendly, you just need to make it! After you make the sandwich, it should be already wrapped and ready to go. I use parchment paper to wrap it if I am going to freeze it because when I remove it from the freezer I can immediately put in the microwave and don’t have to unwrap tin foil. I let it cool down to room temperature (20 or so minutes) while wrapped and then place into a freezer safe bag. It can then go into the freezer and you’ll be good to go! To reheat, remove from the freezer, place in the microwave and heat for 30 seconds then flip. Cook it for another 30 seconds, flip and then repeat this process until warmed up to your desired temperature. This last for 5 days in the fridge or up to a month in the freezer. They probably could go longer in the freezer but I haven’t tested it.

    Ingredient Swaps and Substitutions.

    Here are some of my favorite proteins to put with the eggs.

    1. Ground Sausage
    2. Bacon
    3. Sliced Ham
    4. Sliced Turkey
    5. Sausage Patty

    I’ve found any of these work great in this recipe but I personally don’t like the sausage patty in the sandwich when its reheated from frozen. It takes a touch too long to get warm in the microwave and then the rest of the sandwich feels like lava. I like the ground sausage and the sliced meat to work the best for freezing. I’ll always take some more ideas for proteins to put on this sandwich in the comments below.

    As for the other ingredients, any melting cheeses work great. I either you cheddar or mozzarella but a pepper jack cheese can add some really nice flavors and a touch of spice.

    For the bread, I personally use my own sourdough bread (you can find the recipe here). The only change I make to that recipe is I bake the bread in a bread tin covered in tin foil instead of a Dutch oven. I’ve found this makes a much softer bread and better for this sandwich. If you don’t feel like making bread or that’s not your thing, no worries. Use your favorite bread, or try this recipe with an English Muffin, or bagel. All of these will work but you may have to adjust the amount of egg you put in the sandwich.

    My Favorite Breakfast Sandwich

    • Servings: 1 Sandwich
    • Print

    This meal prep friendly sandwich will start your day off right. The only issue I have with it is I never seem to make enough of them!


    Ingredients

    • 2 Slices of Bread(Bagel or English Muffin works as well)
    • 3 Eggs
    • 1/4 Pound (100 grams) of Ground Sausage or other Protein
    • 1 Slice of Cheese or 20 grams of Shredded Cheese
    • Salt to Taste
    • Pepper to Taste
    • One 15″ x 15″ Tin Foil or Parchment Paper
    • Optional: Additional Protein

    Directions

    1. Start by cooking your sausage to package instructions. Make sure it is cooked through. If you are using a different protein, heat it up slightly in the pan or cook through if raw.
    2. Remove the sausage from the pan once cooked and place in a bowl or plate for later.
    3. Toast your bread in either the toaster or the pan and cook to desired darkness.
    4. Crack the 3 eggs into the pan and scramble. Add in pepper and salt to taste and stir. Cook the eggs until slightly under done and then add the cheese. If you are using ground sausage add it in as well. Stir to combine. Turn off the heat.
    5. Time to assembly. Start with one piece of bread, then place on a protein, then the egg mixture, any cheese if not already added. Then the other piece of bread.
    6. Now place the made sandwich on the parchment paper in the center. Wrap the paper around the sandwich any way you see fit. Just make sure no part of the sandwich is showing after it is wrapped. Use an extra piece of parchment if needed.
    7. Let the sandwich sit for 5 to 10 minutes and then feel free to enjoy. If you are meal prepping this, let it sit for a bit longer until room temperature. Then place into a freezer safe bag and place into the freezer to be enjoyed at a later date.

    Nutrition


    Per Serving:
    675 calories;
    32 g fat;
    49 g carbohydrates;
    50 g protein;

    One last thing to note on this sandwich. It is a rather large sandwich and definitely could be split into two servings and then enjoyed with a bowl of fruit on the side. That is a great option for a person if they can not eat a large meal first thing in the day. Either way, I hope you enjoy this recipe. Let me know if you have any questions or have any suggestions!