Tag: meal prep

  • Yogurt Fruit Bowl

    This recipe has been in my daily meal plan for over 4 years at this point and I don’t see it leaving anytime soon. It’s so good, so simple, high protein, filled with nutrients, and a tasty snack. I eat it everyday as a mid morning snack, pre workout or post workout snack. It uses Greek yogurt, chia seeds, protein powder, and any fruit that is bite sized. What’s even better about this recipe is that it is extremely meal prep friendly. I make a week’s worth of these every time I make them and they store all week long in the fridge.

    In the picture above, I added an additional chocolate chips and chopped walnuts for a little extra fun but I normally don’t add them. One nice thing about these bowls is that you can add almost anything that sounds good and it’ll probably work great.

    Nutritional Notes and Tips

    The Greek yogurt provides a great amount of protein, vitamins, and probiotics. These are all great for a healthy gut and promoting a healthy lifestyle.

    The chia seeds in this recipe provide Omega 3 fatty acids at recommended daily intake as well as additional fats and protein. They also add a nice texture to the yogurt bowl.

    I use a collagen based protein powder to diversify my protein sources but just about any protein powder will work. The protein powder of course adds protein but it also adds the main flavor of the bowl. I personally use a chocolate protein powder(Vital Protein Brand) most of the time but I have also used peanut butter, cinnamon, lemon, marshmallow and so many more. I really like chocolate protein powder as chocolate goes with just about any fruit and makes this taste like a dessert.

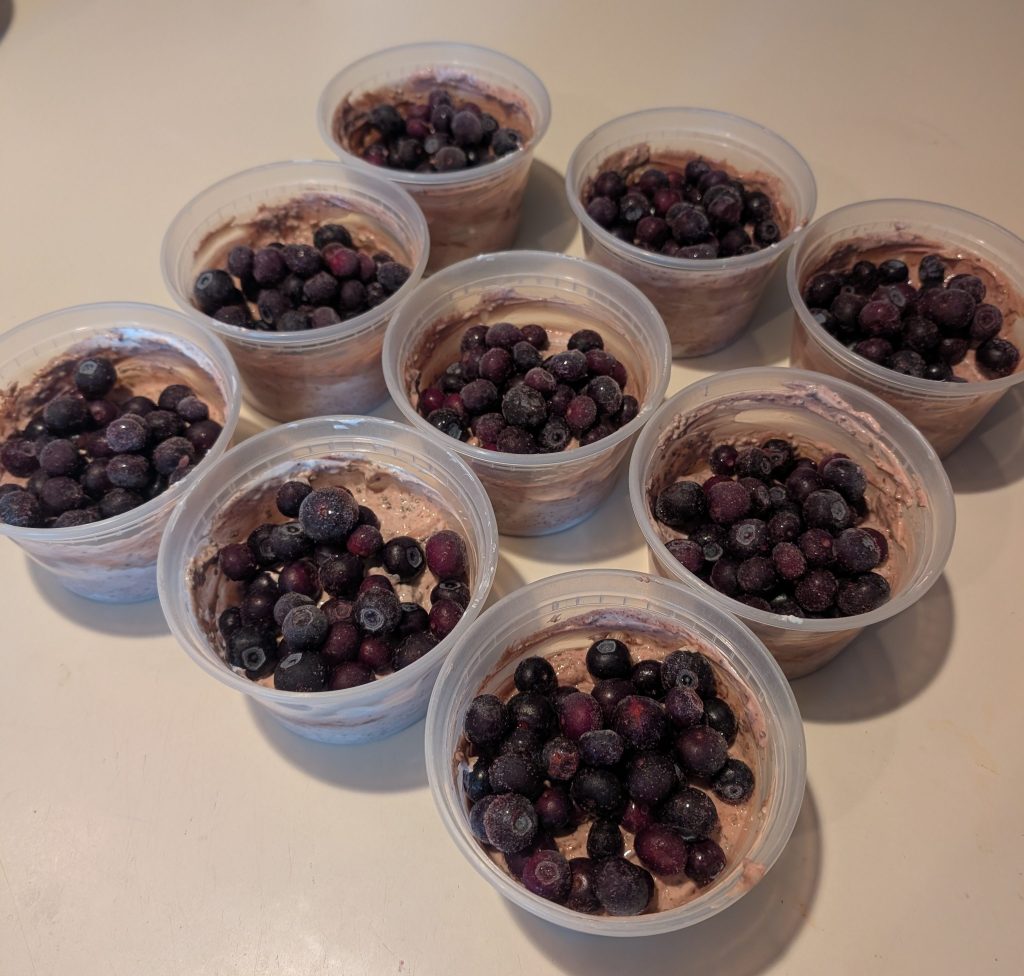
    As for the fruit in this bowl, I like to use berries. I’ve used chopped up strawberries, blueberries, black berries, cherries, and bananas. I use to chop fresh fruit for this bowl and that definitely works but I recently started using frozen fruit. It makes the process so much quicker and easier that its now my go to. You can finally use up that frozen fruit in your freezer that you have been meaning to use!

    In the picture below, you can see how I meal prep all of these for a week. I use a medium sized container and its almost a perfect size. I’ll prep anywhere from 5 to 9 of these bowls at a time but I would try a few less than that first and see what works for you. Let’s get into the recipe.

    Yogurt Fruit Bowl

    • Servings: 1 Bowl
    • Print

    A meal prep friendly yogurt bowl that you will want to eat for a long time!


    Ingredients

    • 170 g (3/4 cup) of Non Fat Greek Yogurt
    • 25 g of Protein Powder
    • 15 g of Chia Seeds
    • 50 g of Fruit of Choice

    Directions

    1. Get your meal prep container or bowl ready to go.
    2. Scoop in your greek yogurt, chia seeds, and protein powder. Mix until combined.
    3. Chop up your fruit if you need otherwise place it into the bowl.
    4. You are now ready to eat or store in the fridge for up to a week.

    Nutrition


    Per Serving:
    265 calories;
    5 g fat;
    19 g carbohydrates;
    37 g protein;

  • My Favorite Breakfast Sandwich

    Are you tired of not having a good breakfast option so you skip breakfast and then you end up being extremely hungry by lunch time? You have found the right recipe for you. This breakfast sandwich is meal prep friendly and you can even prep them for freezing. Whenever I feel like having a breakfast sandwich, I take a little extra time and prep a bunch of these and just freeze them after they have cooled off. That way if I am in a rush one morning, I can grab one of these from the freezer and either heat it up at home or even when I get to the office. I’ll be starting my day right and can get it back on track from the rushed morning. I honestly like them more when I reheat them. All the savory flavors are so delicious. There is one thing to note with this recipe that is critical. WRAP THE SANDWICH AFTER YOU MAKE IT. It may seem ridiculous or unnecessary but it makes this sandwich so much better. Once the sandwich is made wrap it in tin foil or parchment paper and let it sit for 5 to 10 minutes. You can stare at it if you want( I’ve done that a few times), but I try to go do my dishes or make a coffee while it sits and this sandwich becomes restaurant quality. It gives everything a chance to combine and the steam softens the bread giving it the perfect texture. Give this thing a try.

    Meal Prepping Tips

    To make this sandwich meal prep friendly, you just need to make it! After you make the sandwich, it should be already wrapped and ready to go. I use parchment paper to wrap it if I am going to freeze it because when I remove it from the freezer I can immediately put in the microwave and don’t have to unwrap tin foil. I let it cool down to room temperature (20 or so minutes) while wrapped and then place into a freezer safe bag. It can then go into the freezer and you’ll be good to go! To reheat, remove from the freezer, place in the microwave and heat for 30 seconds then flip. Cook it for another 30 seconds, flip and then repeat this process until warmed up to your desired temperature. This last for 5 days in the fridge or up to a month in the freezer. They probably could go longer in the freezer but I haven’t tested it.

    Ingredient Swaps and Substitutions.

    Here are some of my favorite proteins to put with the eggs.

    1. Ground Sausage
    2. Bacon
    3. Sliced Ham
    4. Sliced Turkey
    5. Sausage Patty

    I’ve found any of these work great in this recipe but I personally don’t like the sausage patty in the sandwich when its reheated from frozen. It takes a touch too long to get warm in the microwave and then the rest of the sandwich feels like lava. I like the ground sausage and the sliced meat to work the best for freezing. I’ll always take some more ideas for proteins to put on this sandwich in the comments below.

    As for the other ingredients, any melting cheeses work great. I either you cheddar or mozzarella but a pepper jack cheese can add some really nice flavors and a touch of spice.

    For the bread, I personally use my own sourdough bread (you can find the recipe here). The only change I make to that recipe is I bake the bread in a bread tin covered in tin foil instead of a Dutch oven. I’ve found this makes a much softer bread and better for this sandwich. If you don’t feel like making bread or that’s not your thing, no worries. Use your favorite bread, or try this recipe with an English Muffin, or bagel. All of these will work but you may have to adjust the amount of egg you put in the sandwich.

    My Favorite Breakfast Sandwich

    • Servings: 1 Sandwich
    • Print

    This meal prep friendly sandwich will start your day off right. The only issue I have with it is I never seem to make enough of them!


    Ingredients

    • 2 Slices of Bread(Bagel or English Muffin works as well)
    • 3 Eggs
    • 1/4 Pound (100 grams) of Ground Sausage or other Protein
    • 1 Slice of Cheese or 20 grams of Shredded Cheese
    • Salt to Taste
    • Pepper to Taste
    • One 15″ x 15″ Tin Foil or Parchment Paper
    • Optional: Additional Protein

    Directions

    1. Start by cooking your sausage to package instructions. Make sure it is cooked through. If you are using a different protein, heat it up slightly in the pan or cook through if raw.
    2. Remove the sausage from the pan once cooked and place in a bowl or plate for later.
    3. Toast your bread in either the toaster or the pan and cook to desired darkness.
    4. Crack the 3 eggs into the pan and scramble. Add in pepper and salt to taste and stir. Cook the eggs until slightly under done and then add the cheese. If you are using ground sausage add it in as well. Stir to combine. Turn off the heat.
    5. Time to assembly. Start with one piece of bread, then place on a protein, then the egg mixture, any cheese if not already added. Then the other piece of bread.
    6. Now place the made sandwich on the parchment paper in the center. Wrap the paper around the sandwich any way you see fit. Just make sure no part of the sandwich is showing after it is wrapped. Use an extra piece of parchment if needed.
    7. Let the sandwich sit for 5 to 10 minutes and then feel free to enjoy. If you are meal prepping this, let it sit for a bit longer until room temperature. Then place into a freezer safe bag and place into the freezer to be enjoyed at a later date.

    Nutrition


    Per Serving:
    675 calories;
    32 g fat;
    49 g carbohydrates;
    50 g protein;

    One last thing to note on this sandwich. It is a rather large sandwich and definitely could be split into two servings and then enjoyed with a bowl of fruit on the side. That is a great option for a person if they can not eat a large meal first thing in the day. Either way, I hope you enjoy this recipe. Let me know if you have any questions or have any suggestions!

  • Breakfast Egg Cups

    These are my new obsession. I have made them every weekend for a month straight now and I think I like them more and more every time I eat them. They are super easy to make and fit directly into my health goals. I can make a batch of these and have breakfast everyday for the week without the hassle of making a healthy breakfast each morning before work. These have saved me a ton of time each morning.

    These egg cups are high protein, meal prep friendly, and are super easy to make. They are as easy as they look. Put a slice of ham or turkey into a muffin tin, crack in an egg into each one, add salt, pepper, and cheese, and then bake. Doesn’t get much easier than that for meal prep. And trust me, I’ve done a lot of meal prep over the year. Nothing beats the ease and simplicity. You also can’t beat the macros unless you are having a protein shake but these are much tastier and more disable than having protein shakes everyday. You and your gut will thank you for eating these. Let’s get into the recipe.

    The Recipe

    Breakfast Egg Cups

    • Servings: 6
    • Print

    A quick, high protein breakfast is a great way to start the day. This recipe is a go to for my weekly meal prep.


    Ingredients

    • 12 Eggs
    • 450 grams or 1 pound of Ham or Turkey Slices
    • 30 grams of Shredded Cheese
    • Salt
    • Pepper

    Directions

    1. Spray a standard muffin tin with cooking spray and preheat oven to 375 F 2. Tuck a piece of ham or turkey into each muffin tin almost like a muffin liner
    2. Crack 1 egg into each muffin tin
    3. Put a small pinch of salt and a small crack of black pepper on each cup
    4. Break each yolk with a give it a small stir to mix so salt and pepper are not completely at the top
    5. Add a small amount of cheese to each cup
    6. Once oven is preheated, place tray into oven and bake for 25 to 30 minutes or egg is cooked through.
    7. Pull out of the oven and let cool for 10 to 15 minutes. They are now ready to eat or let them cool further and store them in a container for prep for the week.

    Nutrition


    Per Serving:
    260 calories;
    15 g fat;
    3 g carbohydrates;
    25 g protein;